Quick Start
This guide walks you through building a complete payment form using Hosted Payment Components (HPC). If you haven't already, review the Introduction for an overview of how HPC works.
Prerequisites
Before you begin:
- You have your integration credentials including the HPC endpoint URL (provided by Payen)
- Your payment page is served over HTTPS
- Your Content Security Policy allows loading scripts from the Payen HPC endpoint
We've used the sandbox endpoint https://prprocessing.trustpayglobal.com in the examples. Please replace this with the endpoint provided by your Payen onboarding contact for production deployments.
Step 1: Define the HTML Layout
For each HPC field, create a container element that acts as a placeholder for where the component will render. We use <div> elements with a height of 2.5rem to reserve space for the embedded fields. These containers also receive validation events and CSS classes reflecting their current state.
The example below uses Bootstrap v5.3.8 for layout — you may use any framework or plain CSS.
<!DOCTYPE html>
<html>
<head>
    <title>Test Harness</title>
    <!-- Load the bootstrap tools. Used here for example purposes only -->
    <link crossorigin="anonymous" href="https://cdn.jsdelivr.net/npm/[email protected]/dist/css/bootstrap.min.css"
          integrity="sha384-sRIl4kxILFvY47J16cr9ZwB07vP4J8+LH7qKQnuqkuIAvNWLzeN8tE5YBujZqJLB" rel="stylesheet">
    <script crossorigin="anonymous"
            integrity="sha384-FKyoEForCGlyvwx9Hj09JcYn3nv7wiPVlz7YYwJrWVcXK/BmnVDxM+D2scQbITxI"
            src="https://cdn.jsdelivr.net/npm/[email protected]/dist/js/bootstrap.bundle.min.js"></script>

    <style>
        .btn-pay {
            --bs-btn-color: var(--bs-white);
            --bs-btn-bg: var(--bs-purple);
            --bs-btn-border-color: var(--bs-purple);
        }

        #exampleCardNumber, #exampleExpiryDate, #exampleCVV {
            height: 2.5rem;
        }
    </style>
</head>
<body>
<div class="mt-3 container">
    <div class="row">
        <div class="col-6 offset-3">
            <div class="border p-3">
                <h2>Payment Form</h2>

                <p>Please enter your card details below:</p>

                <!-- full width card number placeholder -->
                <div class="form-control mb-3" id="exampleCardNumber"></div>
                <div class="row mb-3">
                    <div class="col-6">
                        <!-- half width expiry date placeholder-->
                        <div class="form-control" id="exampleExpiryDate"></div>
                    </div>
                    <div class="col-6">
                        <!-- half width CVV placeholder-->
                        <div class="form-control" id="exampleCVV"></div>
                    </div>
                </div>
                <div class="row">
                    <div class="col-4">
                        <button type="button" class="btn btn-secondary w-100" id="exampleCancel">Cancel</button>
                    </div>
                    <div class="offset-4 col-4">
                        <button type="button" class="btn btn-pay w-100" id="examplePay" disabled>Pay</button>
                    </div>
                </div>
            </div>

        </div>
    </div>
</div>
</body>
</html>
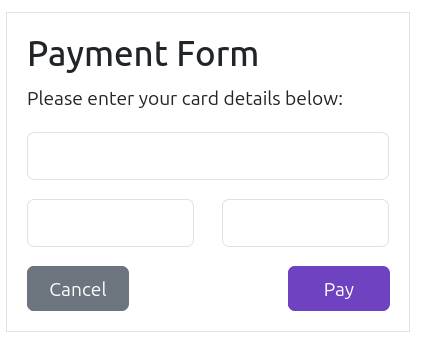
Loading this in a browser shows the layout with blank placeholder fields.
Mobile & Responsive Design
HPC components automatically scale to fit their container width. Handle responsive requirements using standard CSS techniques (Flexbox, Grid, media queries). The embedded inputs behave like normal <input> elements on mobile — triggering virtual keyboards and respecting system font sizes.
/* Example: Stack fields vertically on narrow screens */
@media (max-width: 576px) {
   .payment-row {
      flex-direction: column;
   }
}
Step 2: Initialize the Components
Add a <script type="module"> block before the closing </body> tag. Import OrchestratorMerchant, create a configuration object, and instantiate the orchestrator.
The config maps each container element ID to its field type and applies optional customizations. In this example we set the font size to 1rem for each field.
<script type="module">
 import {OrchestratorMerchant} from "https://prprocessing.trustpayglobal.com/hosted-component/scripts/merchant/orchestrator.esm.js";

 // Configuration object
 const config = {
    // URL of the HPC initialization endpoint (provided in your credentials)
    "initializeUrl": "https://prprocessing.trustpayglobal.com/hosted-component/initialize",

        // Declare which fields to render and map them to container element IDs
        "allowedFields": {
           "cardNumber": {
              "id": "exampleCardNumber",
              "maxLength": 19,
              "styles": {
                 "font-size": "1rem"
              }
           },
           "expiryDate": {
              "id": "exampleExpiryDate",
              "styles": {
                 "font-size": "1rem"
              }
           },
           "cvv": {
              "id": "exampleCVV",
              "styles": {
                 "font-size": "1rem"
              }
           }
        }
     };

     // Create the orchestrator — returns immediately while iframes load asynchronously
     const orchestrator = new OrchestratorMerchant(config);
  </script>
Loading this form now shows active fields with placeholder text. When you enter card details (use a test card from Sandbox), validation CSS classes are applied to each container element automatically. The default class names (is-valid, is-invalid) are Bootstrap-compatible and can be overridden as described in Customizations.
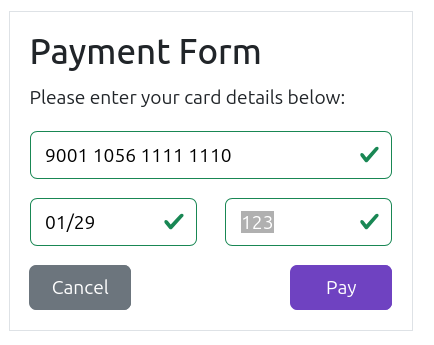
The orchestrator initializes fields asynchronously. Each container fires a hpc.initializationComplete event when ready. See Events for details.
Step 3: Listen for Validation Events
Before calling startSession(), you should verify that all fields contain valid data.
HPC components dispatch custom DOM events on their container elements whenever validation state changes, and additionally apply meaningful CSS classes to the container elements.
Use these to enable or disable your Pay button.
Add the following code inside the same <script> block, after creating the orchestrator:
   // Enable Pay button only when all fields are valid
   const fields = ['exampleCardNumber', 'exampleExpiryDate', 'exampleCVV'];

   function testValidity() {
      document.getElementById('examplePay')
         .disabled = !fields.every((id) => document.getElementById(id).classList.contains('is-valid'));
   }

   fields.forEach((id) => document.getElementById(id).addEventListener('hpc.validation', (e) => testValidity()));
   testValidity();
See Events for the full list of available events including hpc.focus, hpc.cardBrand, and hpc.initializationComplete.
Step 4: Handle the Pay Button Click
When the user clicks Pay, call orchestrator.startSession() to tokenize all field values and receive session keys.
Send these keys to your server for payment processing.
   document.getElementById('examplePay').addEventListener('click', (e) => {

      // A production ready version must guard against the possibility of the user clicking pay multiple times, etc.
      document.getElementById('examplePay').disabled = true;
      document.getElementById('exampleCancel').disabled = true;
      orchestrator.startSession()
         .then((sessions) => {
            // Extract session keys from the Map
            const cardNumberKey = sessions.get("cardNumber");
            const expiryDateKey = sessions.get("expiryDate");
            const cvvKey = sessions.get("cvv");

            // Demonstrative only; DO NOT log session keys in production — they are PCI-sensitive data
            console.log("startSession succeeded:", sessions);

            // Send session keys to your server for payment processing
            fetch('/api/payment', {
               method: 'POST',
               headers: {'Content-Type': 'application/json'},
               body: JSON.stringify({
                  cardNumber: cardNumberKey,
                  expiryDate: expiryDateKey,
                  securityCode: cvvKey
                  // Include any additional payment data (amount, currency, etc.)
               })
            })
            .then(response => {
               if (!response.ok) throw new Error("Payment request failed");
               console.log("Payment submitted successfully");
               // Handle success — e.g. show confirmation page
            })
            .catch(error => {
               console.error("Failed to submit payment:", error);
               // Handle failure — e.g. show error message to user, re-enable buttons, etc.
               document.getElementById('examplePay').disabled = false;
               document.getElementById('exampleCancel').disabled = false;
            });
         })
         .catch((error) => {
            // startSession rejects if fields are empty, or a network error occurs
            console.warn("startSession failed:", error);
            // Show an appropriate error message to the user
         });

      e.preventDefault();
   });
Clicking Pay with valid fields produces session keys logged in the browser console:
startSession succeeded:
Map(3) { cardNumber → "074e9f7f920e4bffafacfc097b9095d4", expiryDate → "f5de020a20974967b0c410256376b0f2", cvv → "46a056d21dd9409aaa033bd5605f8ae4" }
The exact keys will vary — they are unique on each generation.
Session keys are ephemeral and expire approximately 60 seconds after creation. Your backend must forward them to the Payen Direct API promptly, or the authentication request will fail.
Your backend response handling will depend on whether 3D Secure is configured, taking into account the need to display a 3D Secure challenge. See Authorization for possible response codes and 3D Secure flows.
Step 5: Handle Cancellation and Clean-up
When the user cancels, call orchestrator.remove() to clean up all HPC resources including iframe elements and message listeners.
   document.getElementById('exampleCancel').addEventListener('click', (e) => {
      // Clean up HPC components before navigating away
      orchestrator.remove();

      // Add your cancellation logic here — e.g. navigate back to cart
      console.log("Payment cancelled");

      e.preventDefault();
   });
After calling remove(), the orchestrator instance cannot be reused. Create a new OrchestratorMerchant instance if you need to re-initialize components. See OrchestratorMerchant API for details.
Step 6: Call the Direct API
Your backend endpoint receives the session keys. The backend server then initiates a server-to-server call to the Payen Direct API authentication entry point, substituting the keys in place of actual card data:
  "card": {
    "cardNumber": "074e9f7f920e4bffafacfc097b9095d4",
    "startDate": "",
    "expiryDate": "f5de020a20974967b0c410256376b0f2",
    "issueNumber": "",
    "securityCode": "46a056d21dd9409aaa033bd5605f8ae4"
  }
Session keys replace the actual card data in the card section of your Direct API authentication request. All other fields (amount, currency, customer details, etc.) remain unchanged. See Authorization for the full request structure.
Next Steps
Now that you have a working payment form, explore these topics:
- Customizations — Change styles, placeholders, feedback classes, and accessibility labels
- Events — React to validation changes, focus transitions, card brand detection, and initialization completion
- Message Flow — Sequence diagram of the complete payment flow from user interaction through API response
- OrchestratorMerchant API — Full reference for constructor options, methods, and error handling